by Derek Morrison, 14 July 2011, updated 17 July 2011
I’ve noticed more and more people turning up at various higher education conferences or seminars with iPads rather than the traditional laptop. My interest lay not in the iPad’s obvious attraction as a highly portable media access and consumption device but rather in how it is being, and could be, used as a creative device at the simplest level, i.e. for taking notes.
Theoretically, as a tablet computer the iPad could be a powerful writing machine. But … (that Auricle “but” again).
It depends what we mean by “writing”. If we actually mean typing there is always the iPad’s on-screen keyboard and that is what I see most HE conference delegates using. Alternatively, touch typists can plug in a bluetooth keyboard thus converting their iPad into a quasi netbook/laptop. I’ve not seen too many do the latter because after all it’s the convenience of touchscreen computers which has gained them such traction.
But why shouldn’t it be easy to use the iPad and similar for ‘real’ cursive writing which in efficiency terms going to be streets ahead of the hunt and peck that even skilled typists are forced into when using the iPad as a notetaking device? So I set off to see if I could find out.
The answer partly lies in the decision that Apple made to “tune” the capactitive (i.e. detects changes in the electrical field) touchscreen of the iPad for finger interaction and gesture recognition. Such changes in the electrical field are generated by something that conducts electricity, e.g. a user’s finger or, alternatively, a conductive stylus/pen the person is holding coming into the contact with the screen surface. We should note that Apple did not promote the stylus as the interaction mechanism for the iPad because it had to be a different type of device from what had gone before – and their ever-growing sales validate that decision. Unfortunately that optimisation for the human finger both explains why fine point conductive styli are not available and why cursive writing on the iPad is not as easy as it could yet be, i.e. a stylus has to mimic the size and behaviour of a finger.
But I haven’t written or drawn with my finger since I was a child and using a stylus device for fast note taking which feels, at best, somewhat like holding a whiteboard pen with an oversized nib can be a disincentive.
From my perspective that’s a pity. The iPad is an excellent reference model for this category of technology (albeit still a too expensive one for mass access) but an on-screen keyboard just can’t compare to the efficiency and fluidity of cursive note taking / diagramming with a pen/pencil. I can understand why Apple opted for finger interaction but there are occasions where a higher resolution input is required and having to use a stylus with a tip at least the size of a small adult finger end degrades usability in this otherwise most usable of devices.
The ideal would be for designers of such tablet devices to recognise that sometimes low resolution tuning i.e. finger responsiveness, is appropriate but at other times higher resolution is required, i.e. writing with a stylus. But surely the needs of both would clash and compromise the way the touchscreen aspects of the operating system works? Not necessarily. The switch to higher resolution detection could be set to occur only within specific applications, such as writing and drawing. I don’t know if this is already possible at the hardware or operating system level and there may well be a perfectly good electronic engineering reason for why it is not. However, when I put this to my local Apple store they indicated that they had never been asked that question before and would consult internally and “get back to me”. They haven’t yet.
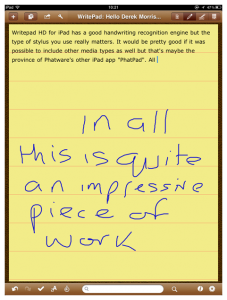
Nevertheless, while I wait for further insights I’ve been exploring a few iPad apps with some potential in this regard, e.g. Dan Bricklin’s NoteTaker HD (yes, he of VisiCalc fame), Mental Note, PhatPad and from the same stable the latest version of WritePad for the iPad. The last two are particularly interesting because of their inbuilt handwriting recognition. All have limitations but the cursive handwriting and gesture recognition in the latest 5.2 version of PhatWare’s WritePad for the iPad (pictured) is pretty good; many of its features are demonstrated in Phatware’s video on YouTube.Choosing the right iPad stylus, however, is going to be a must for any protracted writing. Before I started on this journey I just thought a stylus was a stylus, but no. First you have to choose (or make) a capacitive touchscreen stylus and from my experience the material at its tip really matters. Some stylus tips are made from a rubbery material and some from a conductive foam. My preference is for the latter because I found the physical resistance from the rubbery material on the former slowed me down and so increased handwriting recognition errors. Unfortunately, it’s hard to find about the tip material from stylus supplier’s or distributor’s web sites although the feedback from previous purchasers on Amazon can help. On the rubber nib front the Acase Freehand Fine Art Stylus Pen appears to find favour and for people who prefer the foam tip then the Pogo Sketch Stylus (v2.00) is my choice for the moment.
And the reference to Newton in the title? Well Apple tried all of this once before – less successfully.
Postscript (17 July 2011)
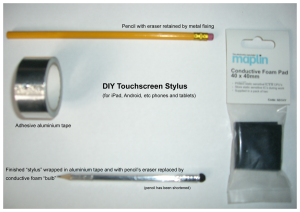
Sometimes solving a very practical problem is good for the otherwise naturally-inclined reflective soul. I have now been using a couple of commercial styli for several days (both rubber and foam nibbed) and was curious to see if I could equal or better their performance by making one for myself. At its simplest using the blunt end of an old pen completely wrapped in cooking foil will do the job but that is neither aesthetically attractive or particularly robust, and risks scratching the surface of an expensive touchscreen. So after prototyping a few models I can now report back on the process I used for producing robust styli in approximately 10 minutes for around GBP 0.40. I consider these outperform those I paid up to 30 times more for and so I offer my small solutions to the world’s economic woes here. The basic items (pictured below) required are:
- A standard pencil with a thin metal cylinder on its end containing a small eraser. (x35 for GBP 1.0 in a discount shop).
- A piece of conductive foam (I bought a couple of 40×40 mm pieces for GBP 0.50 at my local electronics shop).
- A roll of adhesive aluminium tape (around GBP 2.60 also from the electronics shop which would provide enough to produce many many styli. So why not make some for your friends?).
- Scissors.
- A pair of pliers or forceps.
The process is:
- Grip the eraser firmly with the forceps or pliers and pull it out of the end of the pencil in one piece. Try not to damage the now empty metal cylinder at the end of the pencil because that could create sharp edges which could scratch a touchscreen.
- Cut a strip of conductive foam about 10mm wide from a 40mm square with the scissors.
- Fold the cut foam strip in half so that the two open ends are touching and then twist these two ends along about 50% of the folded foam strip to form a stem. The closed end of the folded foam strip should then naturally form a reasonably firm bulb around 6mm in width
- Push the foam stem into the end of the pencil and twist the pencil to aid its insertion. The 6mm foam bulb should now be sticking out of the end of the pencil where the eraser used to be.
- Cut a thin strip of aluminium tape about the same height as the metal cylinder at the end of the pencil, take off its paper backing and then wrap this aluminium strip around the cylinder overlapping a tiny bit on to the foam bulb. Push the overlapped piece down into the cylinder-foam border thus helping retain the foam in place and increasing the contact between the two materials.
- Cut sufficient adhesive aluminium from the roll to completely cover the rest of the pencil from the top of the metal cylinder to the end of pencil (as the picture shows the pencil could be cut to whatever length that suits the user).
The basic principle here is that there is a completely electrically conductive layer extending from the foam all along the pencil’s length. It’s the combination of the foam, the metal pencil eraser holder and the adhesive aluminium tape which makes this happen.The junction where the conductive foam contacts the stylus is particularly important and that’s why I like the pencil’s metal eraser holder because that makes for a good initial connection between the two materials, reinforced by the application of the aluminium tape (which can be pressed well into the foam). Cheap and cheerful it may be but it certainly works and the “stylus” foam bulb at 6mm is about as small as the touchscreen is happy with; it’s also a lot more discreet than some commercial products.
There are variations on the theme which can make use of either small artists’ brushes with metal stocks (which achieve the same conductive purpose as the pencil’s eraser holder). We can even utilise the surrounds of disposable plastic Bic/Biro-type pens or pencils. The trick in that case is to establish a conductive layer between the inside and outside of the plastic tube by doing the following:
- Remove the ink and nib insert.
- One at a time insert half the length of four small strips of aluminium tape into the open end of the now empty pen tube and then fold back the other end of the strips on to the outside of the plastic surround and stick it down. Place a small screwdriver or similar into the plastic tube end to ensure each aluminium strip on the inside surface is also stuck down. Repeat with the other strips. Doing this is what establishes a conductive surface between the inside and outside of the plastic tube.
- Then simply insert the foam “bulb” as described previously (which should now be in contact with the inner aluminium strips) and proceed as before, i.e. wrapping the plastic pen tube in aluminium tape.
Now if I could just find a way of making an iPad or Android tablet for 30 times less. 🙂


Some people are very skilled at this; see Rachel Smith’s video showing how she does visual recording in an iPad:
http://ninmah.be/2010/08/02/ipad-visual-movie/
I’ve watched her do this; she uses Autosketch Pro and she zooms and pans to fill the space, but she draws/writes with her finger (samples here http://www.flickr.com/photos/ninmah/sets/72157624615328301/)
Another colleague does similar work, though Giulia does use a stylus
http://www.flickr.com/photos/gforsythe/sets/72157626965187420/
But these both have good drawing skills which I severely lack. Possibly worth looking at is AudioNote which records audio as you take notes, and is able to sync both together:
http://luminantsoftware.com/iphone/audionote.html
This is the same function that seems to me more of what you are after, but not as an iPad app- the LiveScribe pen
http://www.livescribe.com/